Το Apple Notes είναι μια εύχρηστη εφαρμογή λήψης σημειώσεων για τη διατήρηση και την οργάνωση των σκέψεων και των ιδεών σας σε Mac. Εάν το χρησιμοποιείτε εκτενώς, πρέπει να επωφεληθείτε από τις διάφορες συντομεύσεις πληκτρολογίου του για να βελτιώσετε την εμπειρία σας στη λήψη σημειώσεων. Αυτές οι συντομεύσεις σάς επιτρέπουν να επεξεργάζεστε, να μορφοποιείτε και να οργανώνετε τις σημειώσεις πιο γρήγορα, εξοικονομώντας σας από την ταλαιπωρία της πλοήγησης στα μενού για απλές εργασίες.

Παρακάτω, έχουμε επιμεληθεί μια λίστα με βασικές συντομεύσεις πληκτρολογίου Mac για τα Apple Notes. Θα σας δείξουμε επίσης πώς να δημιουργείτε προσαρμοσμένες συντομεύσεις για Apple Notes σε Mac. Συνεχίστε να διαβάζετε για να μάθετε!
Πίνακας περιεχομένων
Οι καλύτερες συντομεύσεις πληκτρολογίου για την εφαρμογή Notes σε Mac
Ενώ μπορείτε να βρείτε συντομεύσεις πληκτρολογίου για τις περισσότερες λειτουργίες στη γραμμή μενού Apple Notes, έχουμε στρογγυλοποιήσει μερικές από τις πιο σημαντικές για εύκολη αναφορά.
Βασικές συντομεύσεις για καθημερινή χρήση στα Apple Notes
- Δημιουργήστε μια νέα σημείωση: Command+N
- Δημιουργήστε μια νέα Γρήγορη Σημείωση: Fn+Q (λειτουργεί οπουδήποτε στο Mac σας για γρήγορη πρόσβαση στα Notes, εφόσον δεν έχετε αλλάξει τις ρυθμίσεις του πληκτρολογίου)
- Αντιγράψτε μια σημείωση: Command+D
- Δημιουργήστε έναν νέο φάκελο: Shift+Command+N
- Εμφάνιση ή απόκρυψη φακέλων/πλευρικής γραμμής: Command+Option+S
- Εμφάνιση του κύριου παραθύρου Notes: Command+0 (Zero)
- Μετακίνηση μεταξύ της πλαϊνής γραμμής, της λίστας σημειώσεων και του πεδίου αναζήτησης: Tab (αυτό δεν λειτουργεί εάν επεξεργάζεστε μια σημείωση αυτήν τη στιγμή)
- Εμφάνιση σημειώσεων σε μια λίστα: Command+1
- Εμφάνιση σημειώσεων σε προβολή συλλογής: Command+2
- Εμφάνιση συνημμένων: Command+3
- Επισυνάψτε ένα αρχείο: Shift+Command+A
- Συνδέστε μια σημείωση: >>
- Εκτύπωση σημείωσης: Command+P
- Διαγραφή σημείωσης: Command+Delete (κάντε κλικ στη σημείωση που θέλετε να διαγράψετε πριν χρησιμοποιήσετε τη συντόμευση)
- Κλείστε την εφαρμογή Notes: Command+Q
Σημείωση συντομεύσεις επεξεργασίας και μορφοποίησης
Μορφοποίηση
- Εφαρμογή μορφής τίτλου: Shift+Command+T
- Εφαρμογή μορφής επικεφαλίδας: Shift+Command+H
- Εφαρμογή μορφής υποτίτλων: Shift+Command+J
- Εφαρμογή μορφής σώματος: Shift+Command+B
- Εφαρμογή μορφής Monostyled: Shift+Command+M
- Εφαρμογή μορφής λίστας κουκκίδων: Shift+Command+7
- Εφαρμογή μορφής διακεκομμένης λίστας: Shift+Command+8
- Εφαρμογή μορφής αριθμημένης λίστας: Shift+Command+9
- Εφαρμογή μορφής προσφοράς αποκλεισμού: Command+’
- Εφαρμογή μορφής λίστας ελέγχου: Shift+Command+L
Μέγεθος και χρώμα γραμματοσειράς
- Εμφάνιση παραθύρου γραμματοσειρών: Command+T
- Έντονο κείμενο: Command+B
- Πλάγιο κείμενο: Command+I
- Υπογράμμιση κειμένου: Command+U
- Αύξηση μεγέθους γραμματοσειράς: Σύμβολο Command+Plus
- Μείωση μεγέθους γραμματοσειράς: Command+Signal Minus
- Εμφάνιση παραθύρου χρώματος: Shift+Command+C
Λίστα
- Αύξηση επιπέδου λίστας: Command+]ή Tab
- Μείωση επιπέδου λίστας: Command+[ or Shift+Tab
- Add a line break (soft return) to a list item or checklist: Shift+Return
- Insert a tab character in a list item: Option+Tab
- Mark or unmark a checklist item: Shift+Command+U
- Move a list or checklist item up in the list: Control+Command+Up Arrow
- Move a list or checklist item down in the list: Control+Command+Down Arrow
Other formatting shortcuts
- Create a link: Command+K
- Select an emoji: Control+Command+Space
- Copy style: Option+Command+C
- Paste style: Option+Command+V
- Show spelling and grammar: Command+Shift+: (the Shift key is included in this shortcut to press : instead of 😉
- Zoom in on note’s contents: Shift+Command+>
- Zoom out on note’s contents: Shift+Command+<
- Change size of note’s contents to default: Shift+Command+0 (Zero)
Searching and filtering
- Find in currently opened note: Command+F
- Find in all notes: Option+Command+F
- Find next: Command+G
- Find previous: Shift+Command+G
- Use selection for find: Command+E
- Jump to selection: Command+J
Table shortcuts
- Insert a table: Option+Command+T
- Add a row above the current one: Option+Command+Up Arrow
- Add a row below the current one: Option+Command+Down Arrow
- Add a column to the right: Option+Command+Right Arrow
- Add a column to the left: Option+Command+Left Arrow
- Move down a row or create a new row at the bottom: Return
- Move up a row or exit the table when at the first row: Shift+Return
- Go to the next cell on the right: Tab
- Go to the previous cell on the left: Shift+Tab
- Insert a new paragraph inside a cell: Option+Return
- Insert a tab character in a cell: Option+Tab
- Select cells across a row: Shift+Left Arrow or Shift+Right Arrow
- Select cells across a column: Shift+Up Arrow or Shift+Down Arrow
- Highlight the content of the current cell: Command+A
(If not inside the table, this shortcut selects the entire note.) - Highlight the entire table: Command+A (press twice)
(If not inside the table, pressing Command+A selects the entire note.)
Customizing keyboard shortcuts for Apple Notes on Mac
Some functions in the Notes app, like the Lock Note menu or the Check Spelling While Typing menu, don’t have keyboard shortcuts by default. However, you can create your own keyboard shortcuts for these. Here’s how:
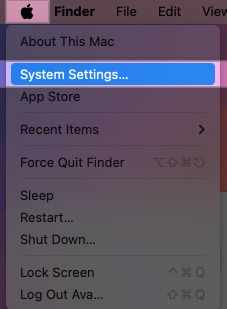
- Click the Apple menu in the top-left corner of your Mac and select System Settings.
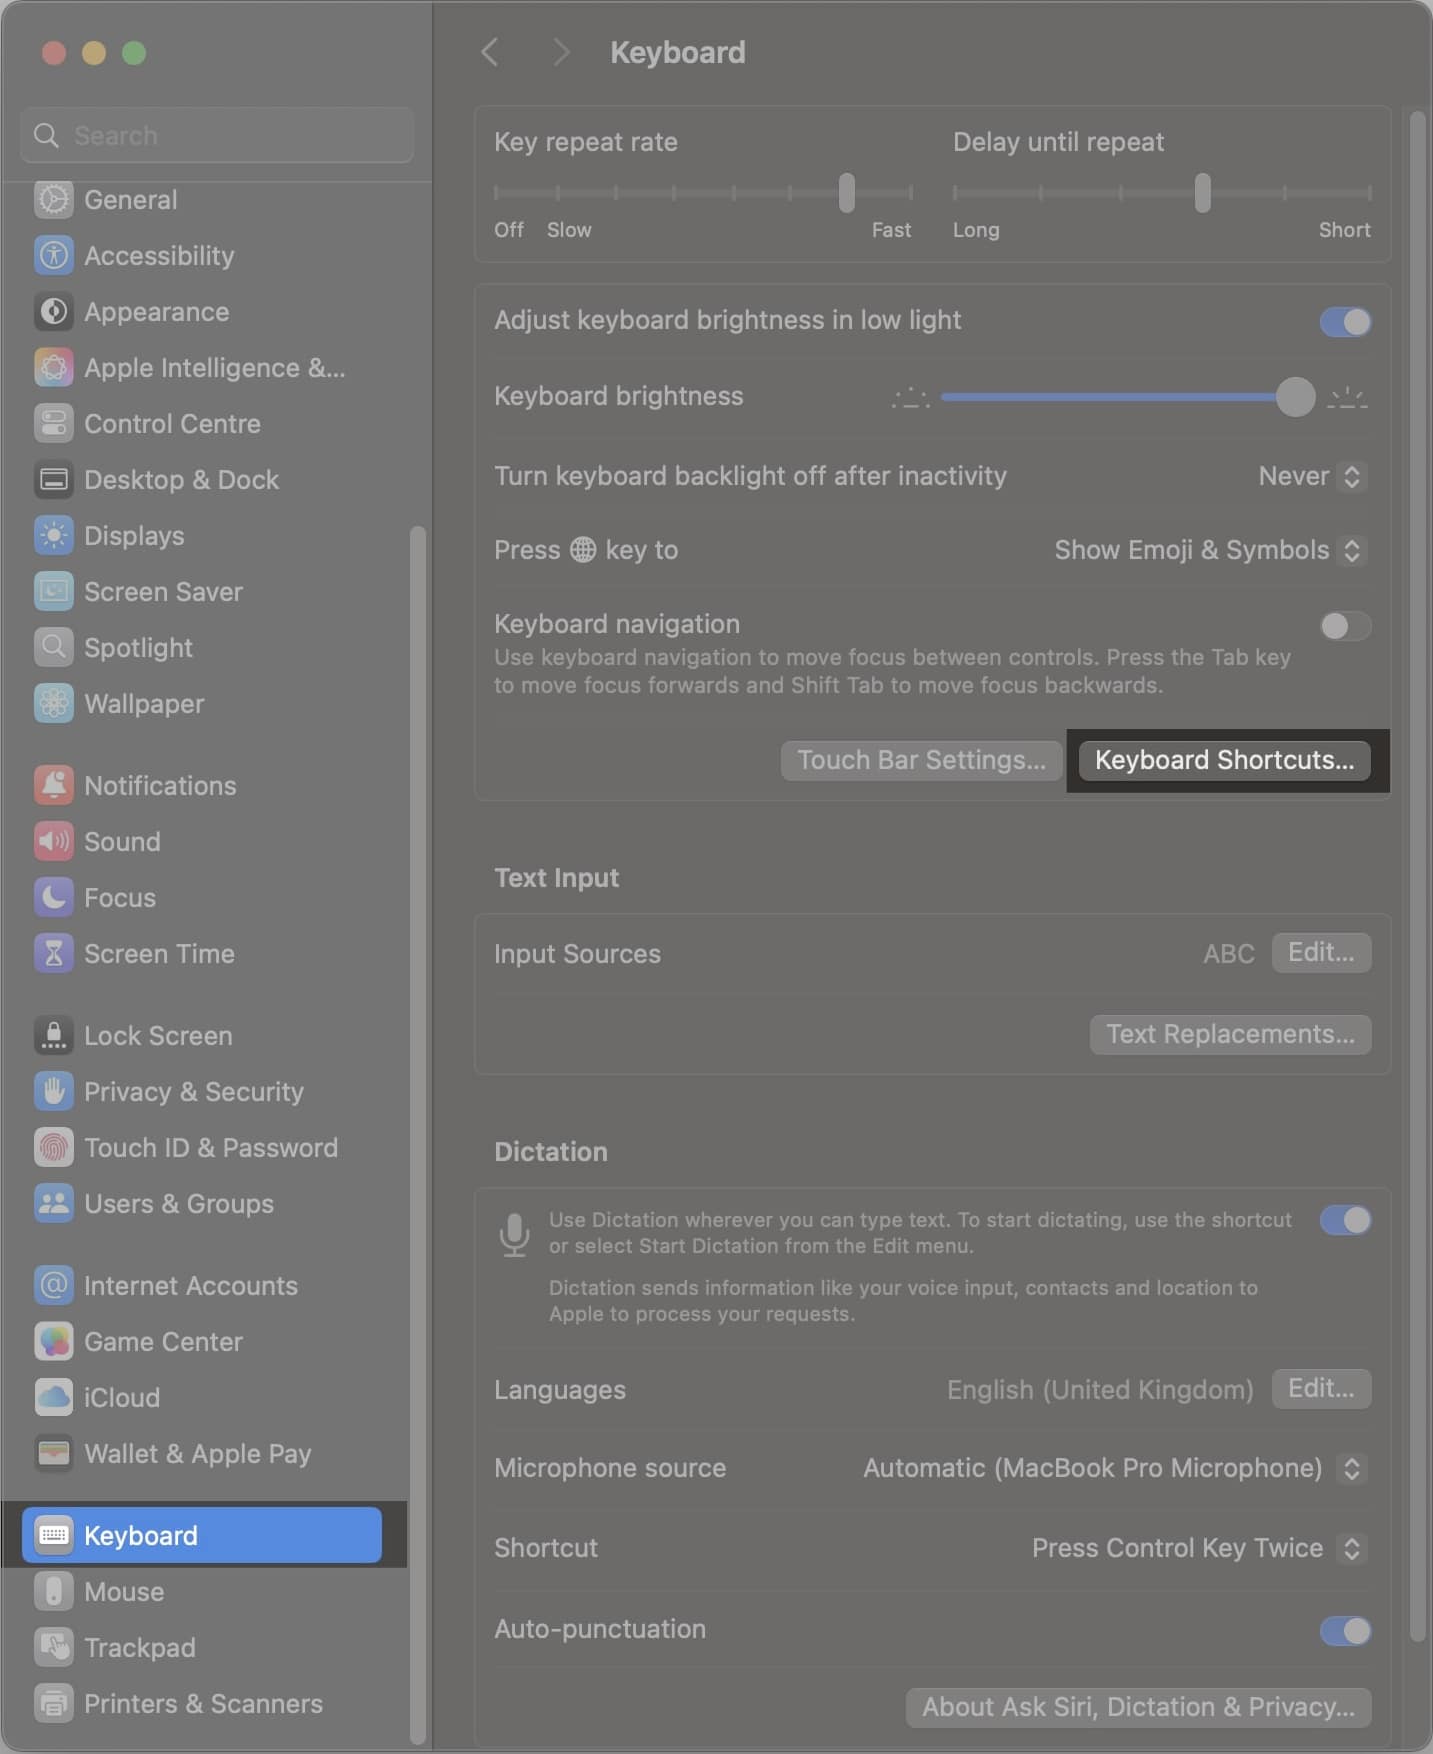
- Select Keyboard from the sidebar, scroll down, and click Keyboard Shortcuts.
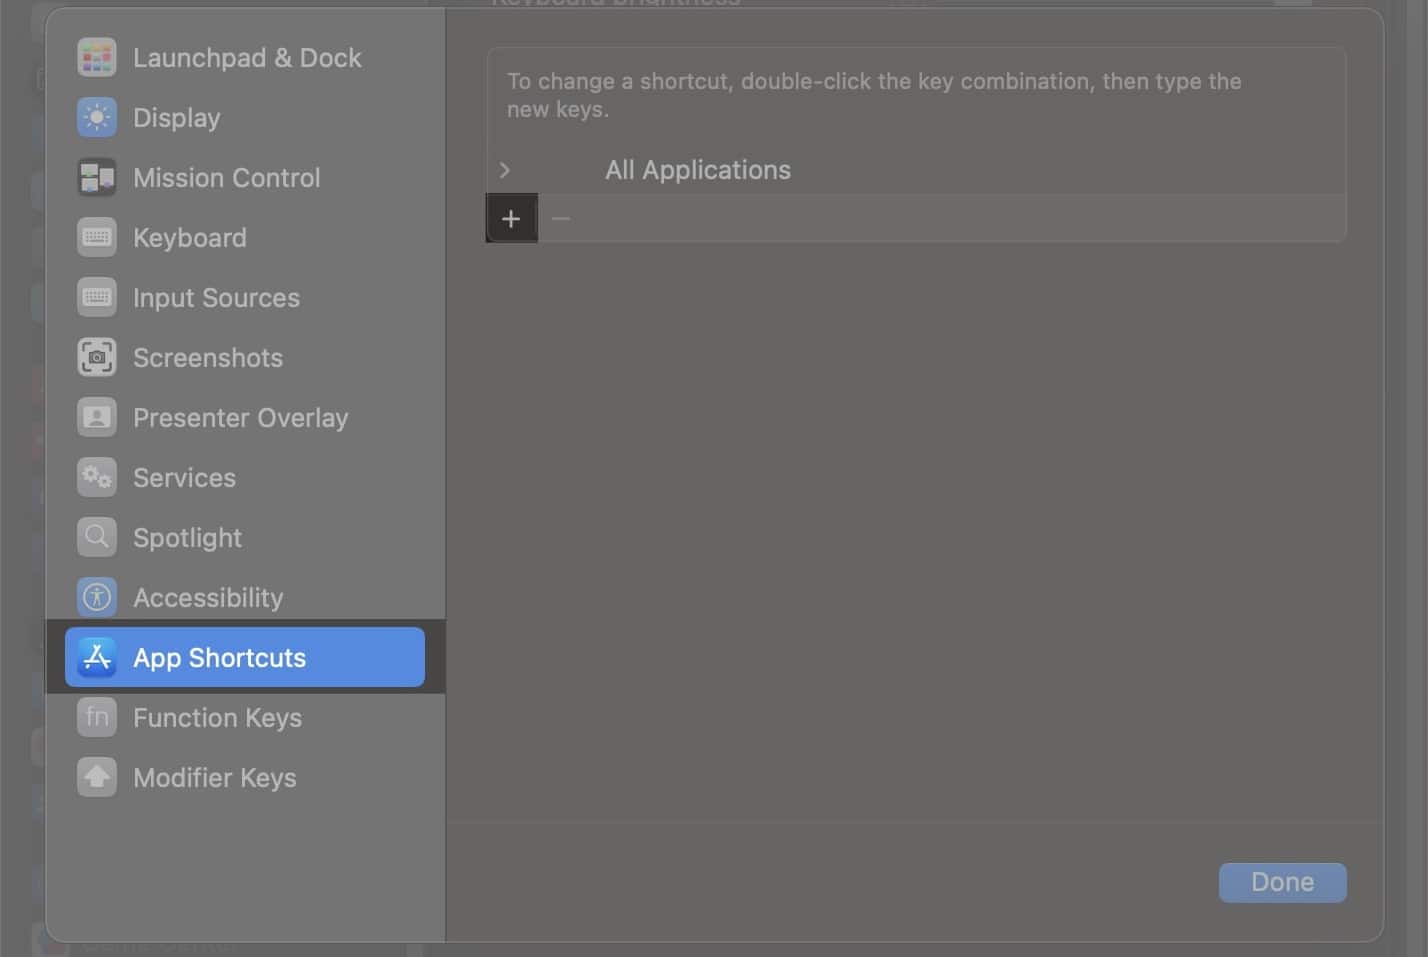
- Choose App Shortcuts from the left, then click the + icon under All Applications.
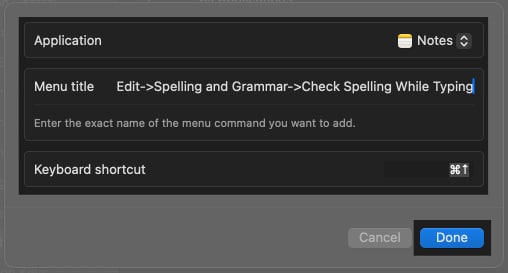
- Click the drop-down button next to Application and select Notes as the app you want to create a shortcut for.
- In the Menu Title field, type the exact command leading to the menu you want to assign a keyboard shortcut for as it appears in the Notes app. For example, if you want to create a shortcut for the Check Spelling While Typing menu, you need to enter: Edit->Spelling and Grammar->Check Spelling While Typing. Remember to use a hyphen before the ‘>’ symbol with no spaces in between each menu, and ensure the menu title matches exactly as it appears in the app.
- Click the Keyboard Shortcut field, press the key combination you want to assign, and then click Done.
Similarly, you can also customize existing shortcuts if the default options aren’t convenient for you.
Discover essential resources to help you unlock your Mac’s full potential!
- Ultimate Guide to Mac Option Key—This comprehensive guide covers all the hidden features and shortcuts of the Mac option key, helping you use it like a pro.
- 300+ Mac Keyboard Shortcuts for Beginners and Pros – Master your Mac with over 300 keyboard shortcuts designed to boost your productivity and make your workflow seamless.
Get them both now on Gumroad and level up your Mac experience!
Signing off…
The shortcuts above should have you covered on most fronts and reduce dependence on the mouse or Trackpad in the Notes app, especially for trivial actions. So go ahead and develop a command over them to improve your workflow in the Notes app on your Mac.
Also read:
- Why is my MacBook keyboard not working, and how can I fix it?
- How to check your MacBook battery cycle count and capacity
- How to link notes in Apple Notes in iOS 18 and macOS Sequoia


